Gatsby on Netlify Source Link
Feeling the perennial urge to learn something new and reset the design, I replaced my previous website and built a new one using Gatsby.
Gatsby
I chose Gatsby for its performance capability and technology choices. Gatsby sites use React, Node, and GraphQL to create a static website that renders both server-side and client-side. Server-side rendering is important for first page load performance: minimizing the amount javascript that needs to run to render the content right off the bat. Client-side rendering enables cleverness such as prefetching a page when the user hovers over a link. This can add over 200ms to the perceived performance and was something that I wanted to build on my previous site for a long time. However, I never got around to because I had not used javascript on that site for anything critical and limiting it to vanilla js. With Gatsby this feature came right out of the box with the gatsby-link component.
That brings me to the next reason I choose Gatsby. I wanted to leverage a js build process on the site and use more tools like React components without compromising all of the benefits of static site generation. Gatsby met this ambition well by providing the static site build process with React and GraphQL, and then, enabling pulling in anything else into the webpack build. For example, I pulled in styled-components and react-icons. This made the development cycle fast and fun.
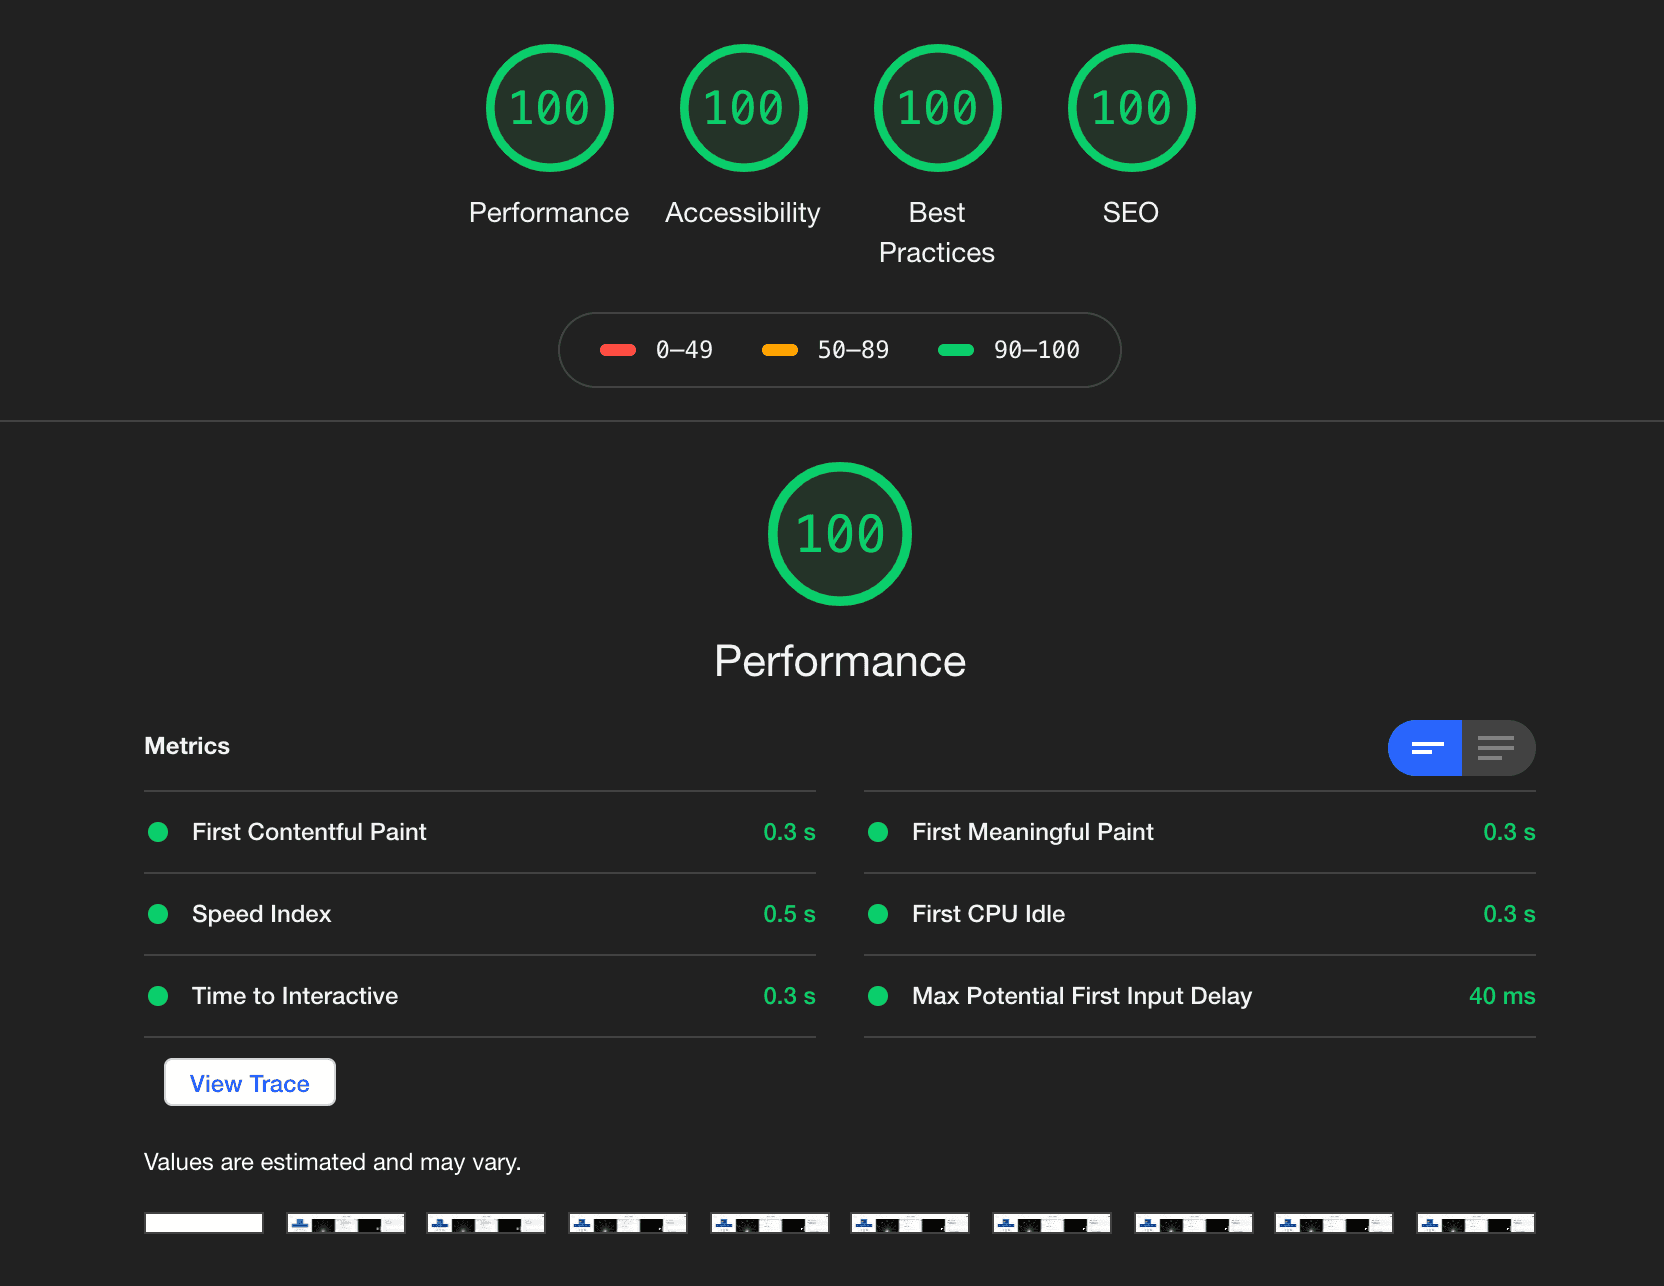
Gatsby's build pipeline handling of image assets also replaced manipulation I had been doing manually with a hodgepodge of tools to edit and optimize them. The gatsby-image component handles responsive sizing, lazy-loading, and multiple image formats in concert with a series of plugins in the build pipeline.
These performance considerations enabled me to get full marks on the Lighthouse performance audit without much work.
GraphQL
Before this project I hadn't had a reason to use GraphQL. I found its organizing principle of minimizing the data sent over the wire compelling, so I was happy to try it out. Gatsby uses GraphQL to structure the static build process. Creating pages such as the project pages generated from markdown operated like middleware on the GraphQL api. In a life cycle method, first I query the markdown pages added to GraphQL by the gatsby-transformer-remark plugin:
const projects = await graphql(`
  {
    allMarkdownRemark {
      nodes {
        fields {
          path
          type
        }
        frontmatter {
          tags
        }
      }
    }
  }
`);
Then I can operate on the data however I want and write it out to the Gatsby database using passed in Redux actions (in this case createPage):
const tags = new Set();

// Add project pages.
projects.data.allMarkdownRemark.nodes.forEach((node) => {
  createPage({ path: node.fields.path, component: ProjectTemplate });
  if (node.frontmatter.tags) {
    node.frontmatter.tags.forEach((tag) => tags.add(tag));
  }
});

// Add tag pages.
tags.forEach((tag) =>
  createPage({
    path: `/tag/${tag}/`,
    component: TagTemplate,
    context: { tag },
  }),
);
Gatsby has a healthy plugin ecosystem so much of the customization work I did may be replaceable with plugins. However, I appreciated how approachable it was to code myself enabling fine-grain control over the build process and output.
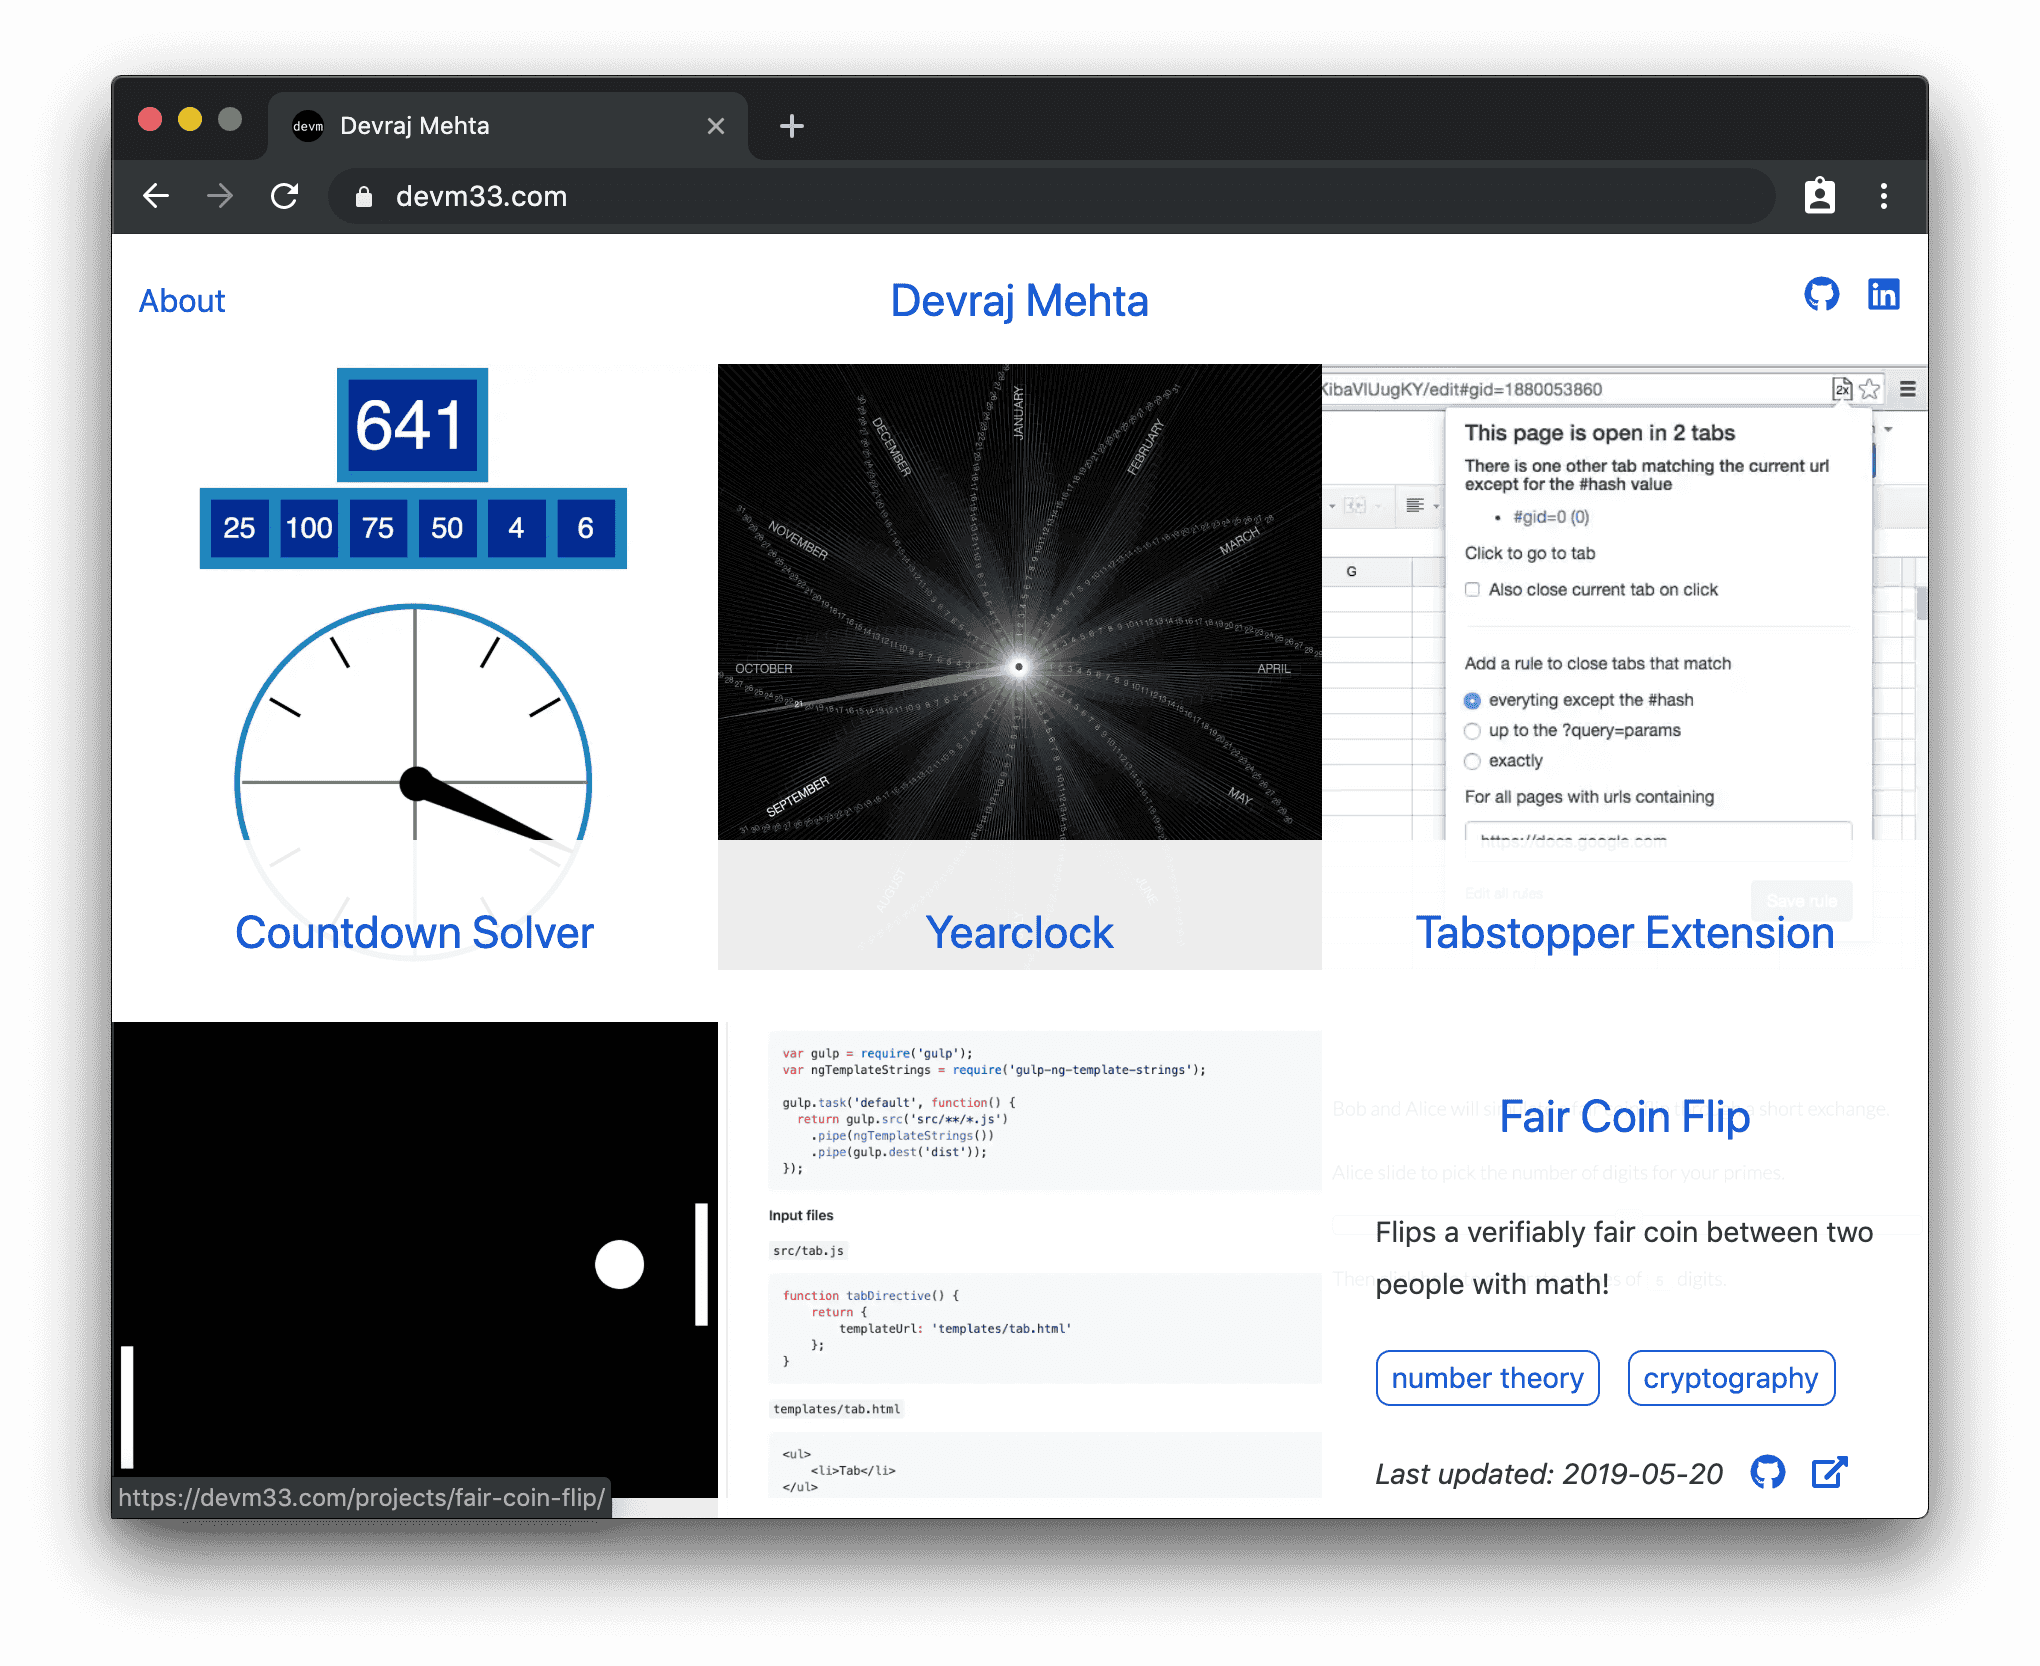
Resume
One page where I took advantage of this flexibility was the resume page. I started with a clean page by not using most of the shared components I used on the rest of the site. I already had my resume data structured in yaml from the previous Jekyll site, so I pulled in a plugin gatsby-transformer-yaml to make the data available via GraphQL. Then I generated the resume page with React, e.g.
{
  jobs.map((job) => (
    <Fragment key={job.id}>
      <TrMeta>
        <td>
          <a href={job.uri}>{job.name}</a>
        </td>
        <td>{job.title}</td>
        <td>
          <i>{job.location}</i>
        </td>
        <TdRight>
          {job.start} {job.finish && "– " + job.finish}
        </TdRight>
      </TrMeta>
      <TrDesc>
        <td colSpan="4">{job.description}</td>
      </TrDesc>
    </Fragment>
  ));
}
Having control over connecting the yaml to the page enabled me to place all the files for the resume in the same folder - organizing by purpose instead of type.
$ ls src/pages/resume
index.jsx  jobs.yml   skills.yml
On the previous site I had been generating the pdf version of my resume manually by printing the resume page to pdf using Chrome. Since I could add anything to the node build process it was straightforward to automate this with puppeteer.
// Generate PDF of resume page
exports.onPostBuild = async () => {
  const browser = await puppeteer.launch();
  const page = await browser.newPage();
  const resumePath = path.join(__dirname, "public/resume/index.html");
  await page.goto(url.pathToFileURL(resumePath));
  await page.pdf({ path: "./public/resume.pdf" });
};
It felt great to automate this manual process, however it did cause me to have to move off of the Netlify build stack. I had been pushing the project to Netlify to have them build it. It turned out the docker image they use for building has one font installed: DejaVu, see this issue I raised. DejaVu is not metrics-compatible with Times New Roman and in my opinion doesn't look as nice. Here you can see the rendering causing issues with the alignment.
To workaround the Netlify limitation, I moved the build onto Travis and pushed the built site to Netlify instead of building it on Netlify. Travis had a similar issue with limited fonts, but they provide sudo access necessary to install the font before the build. Times New Roman is a bit tricky to install since you have accept the EULA, but I ended up getting working like so:
before_deploy:
  - sudo apt-add-repository multiverse && sudo apt-get update -qq
  - echo ttf-mscorefonts-installer msttcorefonts/accepted-mscorefonts-eula
    select true | sudo debconf-set-selections
  - sudo apt-get install -y ttf-mscorefonts-installer
  - npm run build
My travis setup now lints the code, builds the site, and then, deploys to Netlify using their js client. The linting consists of spelling checking with cspell, checking for dead links with remark-lint, checking writing style with write-good, and running eslint on the js and jsx.
Conclusion
While for the most part Gatsby enables a smooth development I experience I have had some issues with the hot-reloading, for example changing out with images. I wish the build process was able to hot-reload changes to the node and config files, but it doesn't seem that this is feasible with the way it's designed, discussion on this issue.
I plan to add more cross-linking between pages to promote discoverability. I'm
thinking of doing this by re-using the ProjectGrid component to show a grid of
related projects at the bottom of each project -- using shared tags to denote
related.